Due to the increase of numbers attending Truly Madly Stampin classes, we are moving to bigger premises. Therefore as of Monday 23rd February, we shall be meeting at Selsley Scout Headquarters, The Green, Selsley, Stroud, Gloucestershire, GL5 5LB. Also we shall be changing the day that we meet to the fourth Monday of the month. Please see list of dates under 'Classes' heading. There is also an ample car park for sole use of the Scout Hut. (January's class will be our last at The Old Endowed School, Rodborough on 12th Jaunary).
So if you would like to come along and find out more about Truly Madly Stampin and use Stampin Up! products then get in touch with me either by email:- trulymadlystampin@hotmail.co.uk or telephone 01452 740258.
Thursday, 11 December 2014
Wednesday, 26 November 2014
Thankful for the End of the Year??
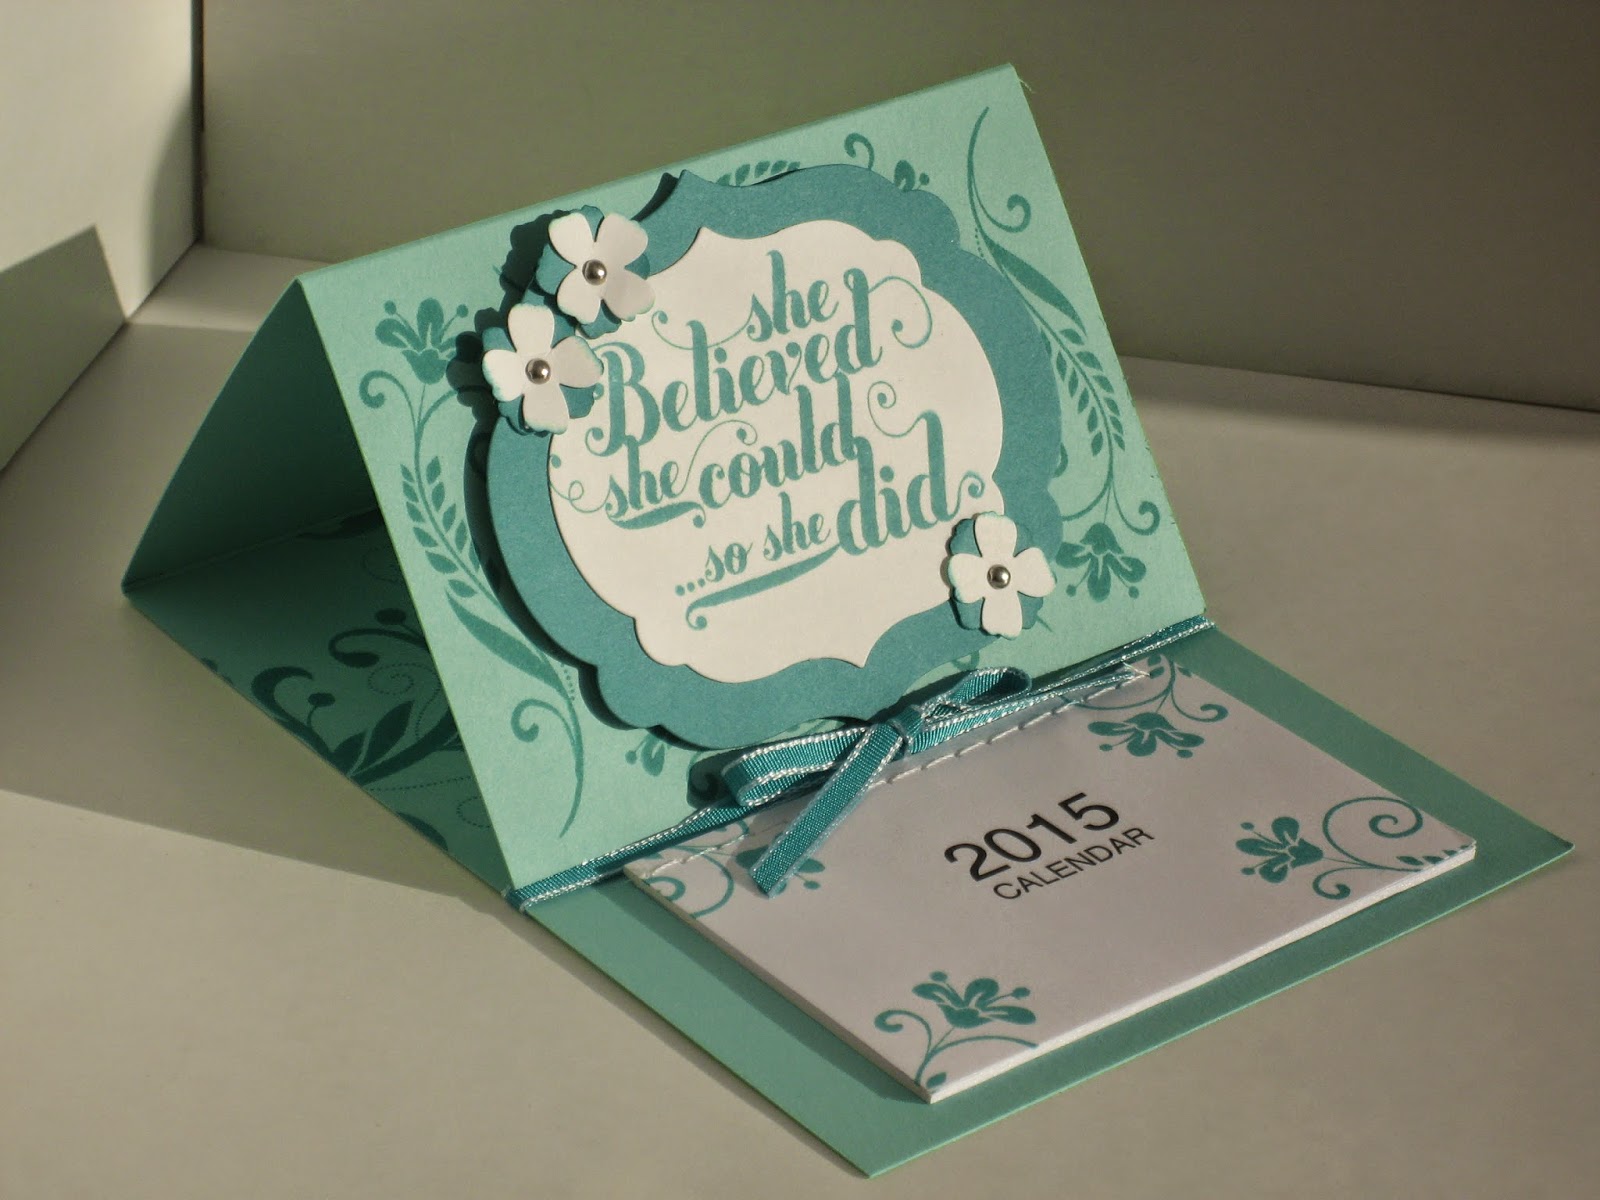
For Decembers class we made two Thank You cards in anticipation of the Christmas presents we hope to receive; plus a small gift suitable for a teacher or fellow work colleague, a desk calendar.
The first card was made using a new technique I have been longing to try out, and was quite happy with the result; watercoloring using aqua painters. (I found the idea from a fellow demo, Lisa Curcio on Pinterest). First we stamped the Watercolor Thank You stamp in Jet Black StazOn ink onto some Stampin Up! watercolor paper and brushed on Rich Razzleberry, Coastal Cabana and Daffodil ink across it using aqua painters (we did need to use a heat gun to dry the paper during class time) to give an almost rainbow effect. We also did the same on a small piece of watercolor paper and cut out using the Bitty Butterfly punch. The main cardstock colours are Basic Black, Rich Razzleberry and Coastal Cabana.

The second card was based on a design I made my up-line's demonstrators training. I didn't have the same stamp sets as were used at the class so improvised using Four You, Gorgeous Grunge and Papillon Potpourri stamp sets and used Pear Pizzazz, Marina Mist and Crumb Cake cardstock and inks.

For our 3D project, we copied the design of a very simple desk calendar that I had received as a swap at a recent regional demonstrator training (thank you Victoria McLafferty). We used the Flowering Flourishes stamp set to decorate the card and calendar pad and the Feel Goods stamp set for the sentiment in Bermuda Bay ink on Coastal Cabana cardstock. As an alternative, my crafters could omit the sentiment and add some more flowers from the Flowering Flourishes stamp set and add a butterfly from the Papillon Potpourri stamp set. To finish off the design, we added some punched flowers using the Itty Bitty Accents Punch Pack using Bermuda Bay and Whisper White cardstock. To make the easel effect of the card stay up, we used a piece of 1/8"th Bermuda Bay Taffeta ribbon.
The first card was made using a new technique I have been longing to try out, and was quite happy with the result; watercoloring using aqua painters. (I found the idea from a fellow demo, Lisa Curcio on Pinterest). First we stamped the Watercolor Thank You stamp in Jet Black StazOn ink onto some Stampin Up! watercolor paper and brushed on Rich Razzleberry, Coastal Cabana and Daffodil ink across it using aqua painters (we did need to use a heat gun to dry the paper during class time) to give an almost rainbow effect. We also did the same on a small piece of watercolor paper and cut out using the Bitty Butterfly punch. The main cardstock colours are Basic Black, Rich Razzleberry and Coastal Cabana.
The second card was based on a design I made my up-line's demonstrators training. I didn't have the same stamp sets as were used at the class so improvised using Four You, Gorgeous Grunge and Papillon Potpourri stamp sets and used Pear Pizzazz, Marina Mist and Crumb Cake cardstock and inks.
For our 3D project, we copied the design of a very simple desk calendar that I had received as a swap at a recent regional demonstrator training (thank you Victoria McLafferty). We used the Flowering Flourishes stamp set to decorate the card and calendar pad and the Feel Goods stamp set for the sentiment in Bermuda Bay ink on Coastal Cabana cardstock. As an alternative, my crafters could omit the sentiment and add some more flowers from the Flowering Flourishes stamp set and add a butterfly from the Papillon Potpourri stamp set. To finish off the design, we added some punched flowers using the Itty Bitty Accents Punch Pack using Bermuda Bay and Whisper White cardstock. To make the easel effect of the card stay up, we used a piece of 1/8"th Bermuda Bay Taffeta ribbon.
Novembers Class (Better late than never!)
Where has the time gone? Christmas is now only 4 weeks away and I still haven't told you what we made at Novembers class! And to top it all our December class is a week early due to a busy venue so will now be next week! I had better get my skates on and start writing the post for that class now too (and I hope I won't be needing 'ice-skates' either!!).
I gave my crafters the option of making either a(nother) Christmas card or a New Home card by using the same set of stamps and design with just a slight change in decoration. The stamp sets used were from the Autumn/Winter catalogue, White Christmas and Holiday Home. The DSP is taken from the Subtles Backgrounds DSP Stack amd the main colours are Early Espresso, Crumb Cake, Cherry Cobbler, Mossy Meadow, Soft Sky, Crushed Curry and Wild Wasabi. The photo doesn't show it too well but Dazzling Details were used as snow on the trees, ground and roof of the Christmas card.

To take a break from Christmas cards, we made a general greeting card using Pictogram Punches and coordinating punch. The 'stars' going vertically down the side of the card were punched out of the top layer of Night of Navy card using the Confetti Stars Punch to show the Crushed Curry card underneath. This punch is great for making confetti for shaker cards - watch this space for a future card design!!
 Our final Christmas themed gift for 2014 - a table centre piece tealight holder (don't worry, its a battery operated one and definitely not intended for use with a real candle!!). This is such a simple idea that I saw being demonstrated at a recent Demonstrator team training (thank you Victoria McLafferty) and just had to share it with you. We used Endless Wishes stamp set to decorate the Whisper White cardstock in Night of Navy, Marina Mist and Pool Party, and again using Whisper White heat embossing powder on the vellum cardstock in the centre of the circle.
 That's all for now but will be back again soon with more designs and maybe some Stampin Up news I can share with you!!
To take a break from Christmas cards, we made a general greeting card using Pictogram Punches and coordinating punch. The 'stars' going vertically down the side of the card were punched out of the top layer of Night of Navy card using the Confetti Stars Punch to show the Crushed Curry card underneath. This punch is great for making confetti for shaker cards - watch this space for a future card design!!
Thursday, 23 October 2014
Christmas Card Making Workshop
On Sunday 19th October, 10 lovely ladies came along to my Christmas card making workshop and made 20 cards and a gift box! They all received a goodie bag containing a set of 20 Stampin Up! notecards and envelopes, a reel of Lost Lagoon 3/8" Silky Taffeta Ribbon, a pack of Frosted Sequins, glue dots and 1/8th of a pack of All Is Calm DSP all for £30! I know the amount of DSP doesn't sound a lot but I wanted to show my ladies just how far these paper packs go so are a very economical buy!
The cards used a variety of techniques:- heat embossing, dry embossing, Big Shot, free-hand cutting, punching, tying of bows (not everyone enjoyed this exercise) and the Envelope Punch Board. The stamp sets that were used were Festival of Trees, Bright & Beautiful, Endless Wishes, Holiday Home and White Christmas. A variety of colours were used; Pear Pizzazz, Soft Sky, Real Red, Old Olive, Lost Lagoon, Pool Party, Smoky Slate and Basic Grey to name a few! they were all proud to go home with all their projects completed in the 4 hours we had for ourselves. Here are some photos from the day:-


 Watch this space for future day workshops in the spring.
The cards used a variety of techniques:- heat embossing, dry embossing, Big Shot, free-hand cutting, punching, tying of bows (not everyone enjoyed this exercise) and the Envelope Punch Board. The stamp sets that were used were Festival of Trees, Bright & Beautiful, Endless Wishes, Holiday Home and White Christmas. A variety of colours were used; Pear Pizzazz, Soft Sky, Real Red, Old Olive, Lost Lagoon, Pool Party, Smoky Slate and Basic Grey to name a few! they were all proud to go home with all their projects completed in the 4 hours we had for ourselves. Here are some photos from the day:-
Start of the Christmas Season!
Well, with only something like 10 weeks to Christmas, I thought I would start to show off the lovely Christmas products form the Autumn/Winter catalogue. It is full of wonderful stamp sets, embellishments, accessories and ideas it was a struggle to decide what to buy. So this week I chose to demostrate the Festival of Trees and Bright & Beautiful sets to create a 3-in-1 project!

As you can see form the picture, we made a card with a circular cut-out using the Circles Framelits and then 'hung' a star from the Bright & Beautiful stamp set, embossed in silver and cut out using the Stars framelits. The circle that was taken from the card was then stamped and again embossed in silver using a masking-off technique witht he greeting in the centre to make a gift tag. A 'ring' of champagne glimer paper was used on the card to hide the bakers twine and the centre of this was decorated with a stamped tree from the Festival of Trees set to make a second gift tag!
Our second Christmas project this week was a mini treatbox in the shape of a birdhouse with a little robin.
 This is an ideal 'thank you' gift for a teacher/neighbour/friend or a table favor etc and can be filled with a few Elizabeth Shaw mints. The stamp set that was used for the snowflakes (stamped in Whisper White Craft ink) and greeting tag (Real Red and Early Espresso markers) was Endless Wishes, another lovely stamp set with lots of seasonal greetings and different sized snow flakes. The box was made from Crumb Cake card stock and the roof from Always Artichoke. The robin was made using the Bird Builder punch in soft suede.
Earlier in the year, Stampin Up! introduced Blendabilities. These are marker pens in 3 shades of several of the main Stampin Up! clolours and are used to create a subtle shading effect when colouring stamped images. So far I hadn't found time to introduce these new items into my classes so thought it was about time.
Plus it gave everyone the chance to indulge in a bit of colouring.

This card uses two punches, the Pansy and the Dotted Scallop Ribbon Border. The DSP was taken from the Moonlight DSP stack and the stamp set used was Flower Shop, stamped using Memento Ink to ensure that the ink did not 'run' into the Blendabilities colours. The two colours used were Daffodil Delight and Rich Razzleberry. The Blendability pens can also be used to colour in Stampin Up! Pearl Basic Jewels (and Rhinestones) so that you can have matching emblishments to compliment your design. The greeting was stamped in Rich Razzleberry ink using the Itty Bitty Banners stamp set.
As you can see form the picture, we made a card with a circular cut-out using the Circles Framelits and then 'hung' a star from the Bright & Beautiful stamp set, embossed in silver and cut out using the Stars framelits. The circle that was taken from the card was then stamped and again embossed in silver using a masking-off technique witht he greeting in the centre to make a gift tag. A 'ring' of champagne glimer paper was used on the card to hide the bakers twine and the centre of this was decorated with a stamped tree from the Festival of Trees set to make a second gift tag!
Our second Christmas project this week was a mini treatbox in the shape of a birdhouse with a little robin.
Earlier in the year, Stampin Up! introduced Blendabilities. These are marker pens in 3 shades of several of the main Stampin Up! clolours and are used to create a subtle shading effect when colouring stamped images. So far I hadn't found time to introduce these new items into my classes so thought it was about time.
Plus it gave everyone the chance to indulge in a bit of colouring.
This card uses two punches, the Pansy and the Dotted Scallop Ribbon Border. The DSP was taken from the Moonlight DSP stack and the stamp set used was Flower Shop, stamped using Memento Ink to ensure that the ink did not 'run' into the Blendabilities colours. The two colours used were Daffodil Delight and Rich Razzleberry. The Blendability pens can also be used to colour in Stampin Up! Pearl Basic Jewels (and Rhinestones) so that you can have matching emblishments to compliment your design. The greeting was stamped in Rich Razzleberry ink using the Itty Bitty Banners stamp set.
Tuesday, 23 September 2014
Septembers Class Projects and New Autumn/Winter Catalogue
This month we welcomed two new crafters and was lovely to introduce them to our group of ladies and the projects we make.
This month we concentrated on using the Big Shot and Embossing Boutique.
For our first project we used the delightful stamp set You Little Furball. This set has a selection of cute cats faces and bodies that can be mixed and matched to create different feline characters. For this card we also used a piece of Moonlight DSP which cordinated well with the Smoky Slate ink used for the cat. As a contrast, we used real red card stock and 1/8" taffeta ribbon. The Embossing Boutique was used with the chevron embosing folder for the backing layer.

Our next project used my latest favourite stamp set and co-ordinating framelits - Flower Patch and Flower Fair framelit dies. This set is so versatile with 19 stamps with useful layering flowers, leaves and greetings. The framelits speed up the process of having to hand-cut out the leaves and flowers. We used quite a few different colours to show how Stampin Up colours work together. The Blackberry Bliss 3/8" Stitched Satin Ribbon is a good addition as a contrast.
 For our 3D project this month we used my favourite Big Shot die, the Top Note, to make a mini clutch bag gift box. The main cardstock colour is Rose Red with Wisteria Wonder Designer Series Paper Stack. The flower was made by punching out 4 x 1 3/4" scallop circles of filter paper and spritzed with Wisteria Wonder ink, scrunched up and topped off with a small Vintage Faceted Designer Button.
 During the evening, we had time to look at the new Autumn Winter Catalogue but you will have to wait until next months class to see the new products that we will be using!
I will be running a card workshop on Sunday 19th October at Frampton Village Hall where we will be making 20 Christmas cards for a class fee of £30 to include a goodie bag to make all the projects and more at home! Please contact me for more details by email at trulymadlystampin@hotmail.co.uk.
This month we concentrated on using the Big Shot and Embossing Boutique.
For our first project we used the delightful stamp set You Little Furball. This set has a selection of cute cats faces and bodies that can be mixed and matched to create different feline characters. For this card we also used a piece of Moonlight DSP which cordinated well with the Smoky Slate ink used for the cat. As a contrast, we used real red card stock and 1/8" taffeta ribbon. The Embossing Boutique was used with the chevron embosing folder for the backing layer.
Our next project used my latest favourite stamp set and co-ordinating framelits - Flower Patch and Flower Fair framelit dies. This set is so versatile with 19 stamps with useful layering flowers, leaves and greetings. The framelits speed up the process of having to hand-cut out the leaves and flowers. We used quite a few different colours to show how Stampin Up colours work together. The Blackberry Bliss 3/8" Stitched Satin Ribbon is a good addition as a contrast.
I will be running a card workshop on Sunday 19th October at Frampton Village Hall where we will be making 20 Christmas cards for a class fee of £30 to include a goodie bag to make all the projects and more at home! Please contact me for more details by email at trulymadlystampin@hotmail.co.uk.
Sunday, 3 August 2014
July New Products Class
Sorry for the delay in this post, its the school holidays so my crafting and administration time is very limited!
Our last class held in July showcased some new products form the new annual catalogue as well as the new in-colours :- Blackberry Bliss, Hello Honey, Lost Lagoon, Mossy Meadow and Tangelo Twist (what fab names!!) They all have a good earthy but bright feel to them and can see that we will be using them a lot.
So, here are the projects that we created:-
 So here we have a lovely mini box that contains 4 gift tags. Just two main colours are used here, Whisper White card stock and Wisteria Wonder cardstock and ink with 1/8" Silver Ribbon and Rhinestone Basic Jewels as embellishments. The two stamp sets used were Label Love and Work of Art, and the two punches that were used were Scalloped Tag Topper (one of my favourtie new punches) and the flower from the new Itty Bitty Accents Punch Pack - more of these later!! The stamping off technique was used on the front of the tags and box and the Wisteria Wonder flowers were daubed with Craft white and and the Whisper White flowers daubed with Wisteria Wonder ink. You could utilize this design for different occasions by changing the colours and using with the star or heart from the punch pack.

Here we have a card with a new technique - Room Divider, and uses the new In-Colors. This is a simple technique where 1/2 a piece of A4 is folded into 4 and the bottom cut out on each of the panels using Curly Label to give the effect of 'legs'. More of the stamps taken from the Work of Art stamp set are used here with most of the new In-Colors ink and card stock, and the 'stampin off' technique is again used. The sequins are taken form the Gold Sequin Trim and the bow is made from Gold Metallic Bakers Twine.
 And finally my favourite card made from my favourite stamp set, Life in the Forest (and carried over from the Spring/Summer catalogue). This seet has some cute animals in it, a raccoon, mouse, hedgehog and a rabbit as well as the toadstool, fox and trees shown here. Ideal for childrens cards and great for colouring in as the stamps are outline ones. The colours used here are Mossy Meadow, Crushed Curry, Tangelo Twist, Night of Navy, Soft Suede with Real Red and Cajun Craze markers. The 'background' was created by sponging Daffodil Delight, Soft Sky and Old Olive ink onto Whisper White card stock. The 'grass' was created using the Fringe Scissors and the sun rays by double punching with the 1 1/4" scallop circle. The greting taken from Itty Bitty Banners. Some Gold Metallic Bakers Twine wraps it all up!
I hope you have enjoyed seeing these creations and don't forget to get in touch with me if you would like to come along to my next class in September where I will be albe to show you the new Autumn/Winter catalogue! Its never to early to get organised for Christmas.
Our last class held in July showcased some new products form the new annual catalogue as well as the new in-colours :- Blackberry Bliss, Hello Honey, Lost Lagoon, Mossy Meadow and Tangelo Twist (what fab names!!) They all have a good earthy but bright feel to them and can see that we will be using them a lot.
So, here are the projects that we created:-
Here we have a card with a new technique - Room Divider, and uses the new In-Colors. This is a simple technique where 1/2 a piece of A4 is folded into 4 and the bottom cut out on each of the panels using Curly Label to give the effect of 'legs'. More of the stamps taken from the Work of Art stamp set are used here with most of the new In-Colors ink and card stock, and the 'stampin off' technique is again used. The sequins are taken form the Gold Sequin Trim and the bow is made from Gold Metallic Bakers Twine.
I hope you have enjoyed seeing these creations and don't forget to get in touch with me if you would like to come along to my next class in September where I will be albe to show you the new Autumn/Winter catalogue! Its never to early to get organised for Christmas.
Stampin' Up Big Shot promotion for the month of August ONLY!!!
Have you been thinking of getting a Big Shot to suppliment your crafting supplies but haven't quite convinced yourself to? Then wait no longer as for the month of August only, Stampin' Up has a fantastic offer just for you! When you buy a Big Shot machine from Stampin' Up this month, you can choose one of 5 stamp sets and co-ordinating framelits sets for FREE - yes FREE!!! And not only that if you already have a Big Shot or would like more stamp set /framelits bundles that are part of ot this offer, you can get them with a 15% discount!:-
Big Shot Die-Cutting (and Embossing) Machine £87.95 (pg 224 of Annual Catalogue)
The bundles are as follows
Sumthin' with Bubbly Words Bundle:-
Sumthin' Sumthin' stamp set (pg 8 of Annual Catalogue) + Word Bubbles framelits (pg 230 of AC)
Wood set = £28.75, Clear set = £26.95
Flowery Daydream Bundle:-
Daydream Medallions stamp set (pg 70 of AC) + Floral Frames framelits (pg 231 of AC)
Wood set £47.50, Clear set £41.50
Decorative Goodies Bundle:-
Oh My Goodies stamp set (pg 9 of AC) + Deco Labels framelits (pg 231 of AC)
Wood set £36.25, Clear set £31.25
Celebrating Chalk Talk Bundle:-
Day of Celebration stamp set (pg 54 of AC) + Chalk Talk framelits (pg 230 of AC)
Wood set £ 37.25, Clear set £31.95
The Bright and Beautiful set is from the new Autumn/Winter Catalogue which isn't available to our customers yet so see the images below to see what the stamp set looks like and the Stars framelits are on pg 231 of the annual catalogue. Wood set £44.95 and Clear set £38.95 .
Please note that this deal cannot be used in conjunction with any party hostess discounts
So get in touch with me by before 31st August to place your order and find out just how versatile this awesome product is!
Tuesday, 10 June 2014
Just a few Hearts and Butterflies
Well, this is our last class where we will be using the products from the current 2013-2014 Annual Catalogue. I have been able to have a sneak peak of the new one and it is full of some great stamp sets, new colours, papers, accessories etc so make sure you come along to my July class on Monday 14th to have a look too.

Ok, back to this months class. We had a couple of suggestions from last months' class on what sort of cards our ladies would like to make. Our first was a wedding card. This one can also be used for an anniversary or engagement card as well. The main colours are whipser white, sahara sand and very vanilla with smoky slate ink. The hearts were stamped in smoky slate ink using the Hearts a Flutter stamp set and cut out using the Hearts a Flutter framelits. The greeting on this card was taken from Petit Pairs and stamped again using smoky slate onto whisper white card, punched out with the large oval and backed by a piece of sahara sand punched out using the scallop oval punch. A few basic pearls really give that extra touch to this card.

The second idea was for a 21st female birthday card so the idea I came up with can be used for either a general birthday or a special 'age' one. The main card stock is very vanilla, then using the Woodgrain stamp stamped using crumb cake ink onto crumb cake cardstock. The surround that the butterflies are 'perched on' was made using the Window Frames Collection framelits and pear pizzazz cardstock.

The butterflies were made by stamping the smaller butterflies from the Papillon Potpourrir stamp set in Versamark onto wisteria wonder, blushing bride and pool party card stock and then punched out with the Bitty Butterfly punch. The greeting or number is mounted onto a backing piece of very vanilla cardstock, cut using the 'in-between' size framelit die. The number was cut out of Silver Glimmer paper using the Typeset Alphabet Bigz die. The greeting was stamped using the Memorable Moments stamp set in Early Espresso ink. Finally the flowers were punched using scraps of pool party, wisteria wonder and blushing bride using the the Itty Bitty Punch pack with a small basic pearl in the middle.

This months box is a 'pillow box'. This can be used to contain a scarf, tie, some sweets or any other small gift. For this design, we drew around a template I had made onto basic black cardstock. The band is a piece of Modern Medley DSP edged with a strip of real red cardstock cut using the scallop trim border. The butteflies and border for the greeting were taken from the Creative Elements stamp set. The butterflies were stamped in real red ink onto very vanilla cardstock and hand cut, the greeting was taken from the Express Yourself hostess stamp set in basic black onto very vanilla cardstock. Finally the leaves were punched out using the Bird Builder punch in basic black.
Ok, back to this months class. We had a couple of suggestions from last months' class on what sort of cards our ladies would like to make. Our first was a wedding card. This one can also be used for an anniversary or engagement card as well. The main colours are whipser white, sahara sand and very vanilla with smoky slate ink. The hearts were stamped in smoky slate ink using the Hearts a Flutter stamp set and cut out using the Hearts a Flutter framelits. The greeting on this card was taken from Petit Pairs and stamped again using smoky slate onto whisper white card, punched out with the large oval and backed by a piece of sahara sand punched out using the scallop oval punch. A few basic pearls really give that extra touch to this card.
The butterflies were made by stamping the smaller butterflies from the Papillon Potpourrir stamp set in Versamark onto wisteria wonder, blushing bride and pool party card stock and then punched out with the Bitty Butterfly punch. The greeting or number is mounted onto a backing piece of very vanilla cardstock, cut using the 'in-between' size framelit die. The number was cut out of Silver Glimmer paper using the Typeset Alphabet Bigz die. The greeting was stamped using the Memorable Moments stamp set in Early Espresso ink. Finally the flowers were punched using scraps of pool party, wisteria wonder and blushing bride using the the Itty Bitty Punch pack with a small basic pearl in the middle.
This months box is a 'pillow box'. This can be used to contain a scarf, tie, some sweets or any other small gift. For this design, we drew around a template I had made onto basic black cardstock. The band is a piece of Modern Medley DSP edged with a strip of real red cardstock cut using the scallop trim border. The butteflies and border for the greeting were taken from the Creative Elements stamp set. The butterflies were stamped in real red ink onto very vanilla cardstock and hand cut, the greeting was taken from the Express Yourself hostess stamp set in basic black onto very vanilla cardstock. Finally the leaves were punched out using the Bird Builder punch in basic black.
Saturday, 31 May 2014
Farewell To 2012-2014 In-Colors!
For this months class projects, I decided to concentrate on using the 2012-2014 In-colors that will be retiring at the end of June. These are Gumball Green, Midnight Muse, Primrose Petals, Raspberry Ripple and Summer Starfruit.

Our first card was designed with Fathers Day in mind but could also be used as a birthday card for a male or female. The greetings we used came from the Delightful Dozen set with has a nice combination of greetings in different fonts. The 3D balloon was made by punching out 3 Large Ovals from I Am Me DSP and then folded and glued together on to a 2" diameter circle. The basket was made using the Create a Cupcake stamp set chosing one of the cupcake 'cases' stamped in Baked Brown Sugar and punched out using the Create a Cupcake punch. The sky effect was creating by using the masking tape technique with Soft Sky ink. This is done by coating a piece of masking tape with ink and then rubbing it onto the card stock several times. You can re-ink as required to give a blended 'sky' effect. A piece of Gumball Green cardstock embossed using the heart folder from the Adorning Accents embossing folder was used in the background. Finally a piece of Night of Navy 1/4" Stitched Grosgrain was tied across the bottom of the front part of the card. The other main colours used were Midnight Muse, Gumball Green and Whisper White.
 Our second card was CASEd from an American demonstrator (whose name I have now forgotten!). You can't tell from the photo but the front of the card is cut across the middle and the Happy Birthday greeting (taken from the Perfectly Penned stamp set) is on the inside. This is a good card for using up pieces of dsp, the one used here was taken from the I Am Me DSP set. The flowers are stamped in Primrose Petals using the Flower Shop and Petit Petals stamps sets and punched out using the Petit Petal punch and Pansy punch. Some Whipser White organza ribbon and basic pearls finish off the design. You could use any colour combination on this card or keep it to one basic colour to give different effects.
 At this months class we also made a small gift box and we will continue to make a small 3D project at our classes as time allows. This one is such a simple design and uses 1/2 sheet A4 of Summer Starfruit cardstock and just two glue dots to stick it together. The pattern on the front of the box was made using the Amazing Accent wheel in Gumball Green ink on Whisper White cardstock. The background card is Raspberry Ripple. The flower was made using two pieces of card, one Whisper White and one Raspberry Ripple and cut using the Blossom Party Originals big Shot die. The centre of the flower is a 3/8" Glimmer Brad. Finally the hole for the handle was punched using the small oval.
Saturday, 26 April 2014
Girls Birthday Party Projects
This month I was asked to do another 13th birthday party for a group of 7 girls. I had found out the birthday girl's favourite animal and designed a set of 4 notecards, giftbox and a bookmark around this theme, in this case dogs. I also found out what the girls favourite colours were and these were used in their projects. The girls had a great time, using the various punches to make the dogs:- 1 1/4" circle for the head, 1 3/8" circle for the body; 3/4" circle for the paws and Word Window for the ears. The 'kennel' was embossed using the Stripes embossing folder and the roof edge punched using the Scallop border punch with a Small Heat at the apex. The box for the gift cards was made from a square of Early Espresso card stock and scored using the Simply Scored Scoring Tool. The girls used their favourite animals from the Storybook Friends stamp set to decorate the box. The bookmark was made using the Scalloped Tag Topper punch, Small Heart punch and standard hole punch to create the paw prints. They spent a very quiet 2 hours making their projects and seemed to be very pleased with their creations. (Unfortunately I forgot to take my camera to be able to take a photo of their finished projects so have only taken a photo of the sample set I had made the show the girls what they were going to make).


Aprils Punch Art Class
One of my favourite ways of making cards is using the technique Punch Art. This is where multiple punches are used to create the card designs. At this months class, both cards used a variety of common punches to create quite effective results.
 The first, a piano card also used a Stampin' Around Wheel with the Music Notes Wheel to give a background image. The only colours used were Whisper White, Smokey Slate and Basic Black with StazOn ink. The main keyboard was cut using the Top Note Big Shot die and the keys were punched out with the Word Window punch. The greeting was taken from the Perfectly Penned stamp set.
 By popular request we made a neutral birth contragulations card with a pram treat holder designed by the fabulous Brenda Quintana. This American designer has created so many Hershey Chocolate treat holder designs that are just so easy to make but look wonderful. The card is a step-design and used So Saffron, Pistachio Pudding and Very Vanilla card stock with Gingham Garden DSP as the background. The panels were embossed using the Perfect Polka Dots Embossing folder ( my favourite folder and I apologise that I may seem to over use this!). The pram was made using 3 circle punches:- 3/4", 1" and 2 1/2", and the Scallop Trim Border punch with the handle made from a sliver of card cut using the Large Oval Punch. Hearts made from scraps of Pistachio Pudding, So Saffron and Very Vanilla card stock were punched out using the small heart punch to add to the card. The greeting was taken from the Itty Bitty Banners stamp set and stamped using Daffodil Delight ink.
The pram treat holder was made with Daffodil Delight card stock. A perfect card and gift to give to new parents!
The pram treat holder was made with Daffodil Delight card stock. A perfect card and gift to give to new parents!
Sunday, 30 March 2014
Mothers Day Sale-a-bration and Some Embossing Techniques

This month we went for a more subtle note and used the current in-colors Crisp Cantaloupe and Pistachio Pudding (what lovely names!!) for a Mothers Day card, which could also be used for a birthday card or get well wishes. The main card uses Crumb Cake card stock and was 'distressed' around the edge using the Stampin' Distress Tool. The DSP is from the Sale-a-bration pack, Sweet Sorbet and the ribbon is Crisp Cantaloupe Ruffle Stretch Trim. The flowers were stamped using the Flower Shop stamp set and punched using the Pansy punch with the centres being stamped using Crushed Curry and punched out using the 1/2" Circle Punch. The leaves were created from Pistachio Pudding card stock and cut using the Little Leaves Sizzlits. The Pistachio Pudding cartdstock on the main card was edge with the Needlepoint Border Embossing folder. Finally the greeting was taken from Delightful Dozen stamp set and cut out using the Large Oval Punch.
We also made a matching bookmark using some Sweet Sorbet SAB DSP mounted onto a piece of Pistacthio Pudding and the end punched with the Scalloped Tag Topper Punch. Some Crisp Cantaloupe twine taken from the Sweet Sorbet Accessory set was threaded through the hole. For a personal touch, we added the inital of the recipiant by using the Bigz Alphabet die and Pistachio Pudding and then coated with some Crystal Effects.

Spring Time Saturday Class
On Saturday 8th March I held a Saturday morning class at Frampton Village Hall with projects based around the Bright Blossoms stamp set. We made 6 cards, 2 each of 3 designs and made a box suitable for a candle holder and decorated a tea-light candle to go with it.
 As Easter and Mothers Day were not far off, I made all the cards suitable for both occasions and the greeting could be changed to suit using either the Delightful Dozen or Express Yourself stamp sets. All the cards used Daffodil Delight 1/22 Seam binding which everyone had a reel of in their goodie bag as well as a 1/2 pack of Fresh Prints DSP.

As you can see form this card, just by removing the punch art rabbit, this is an easy card suitable for all occasions. The main colours used in these cards were taken from the subtles family, So Saffron, Pink Pirouette and Pear Pizzazz. The 'grass' was created by using the new Fringe Scissors.
 This card makes quite a bold impression with the contrasting Basic Black, Real Red , Old Olive and Daffodil Delight colour scheme.

 The above two cards were an experiment to show what different eggect you can crate by changing the colour scheme and DSP but maintaining the same design. I made the top card as a 'make and take' one for people who wanted to drop into the class without booking to see what Stampin' Up! was all about. The bottom card uses Real Red, Old Olive and Tempting Turquoise.
 And finally a lovely gift box to house a decorated tea-light with a holder for that perfect spring-time gift! The colours used here are Real Red, Bermuda Bay Whisper White; and the main body of the box used Crumb Cake.
As you can see form this card, just by removing the punch art rabbit, this is an easy card suitable for all occasions. The main colours used in these cards were taken from the subtles family, So Saffron, Pink Pirouette and Pear Pizzazz. The 'grass' was created by using the new Fringe Scissors.
Sunday, 23 March 2014
Childrens Parties
I thought I would share with you what was made at a recent childrens birthday party I was asked to do. the 5 girls were all aged 13 years old and made a set of four notelets, matching envelopes, storage box and decorated a mini notebook and pen! The girls all had a great time and were a pleasure to teach. Prior to the party I had asked for their favourite colours from the Brights Designer Series Paper Stack and they used the various images from the stamp set Storybook Friends to make their projects. The timing was perfect, it took exactly 2 hours, so if you are thinking of a different type of party to have, then let me know!


Monday, 10 February 2014
Sale-a-bration is here!!
Yes, its that time of year again where you can get free products from the limited edition Sale-a-bration catalogue with every £45 you spend from the main catalogues! At this weeks class we made two cards using the free products.

The first one used the really versatile stamp set Banner Blast and its coordinating Banner punch from Sale-a-bration. This set can be used to celebrate any occasion and as well as the 'banner' stamps, there is a heart, star and flower perfect for adding as an embellishment to the banner or as a background! The Banner punch can be used to cut out any DSP as well as card stock! The colours used in this project were Whisper White, Bermuda Bay, Rich Razzleberry, Daffodil Delight and Melon Mambo. The background was embossed using the Chevron Embossing folder and the greeting taken from the Perfectly Penned stamp set. Linen thread tied into a bow and placed at the end of the banners finishes off the card.


The second card we made was based on an idea I found from an American demonstrator, Mary Fish who has lots of lovely, crisp design ideas. This one uses another Sale-a-bration stamp set See Ya Later and the Sale-a-bration DSP, Sweet Sorbet. The design of this card is called an easel and the main colours used were Whisper White, Basic Black and Pool Party which compliment the colours of this sheet of DSP perfectly. The black flowers were punched out using the Petit Petals punch from the new Spring/Summer catalogue and the Pool Party flowers from the Itty Bitty punch pack and finished off with a Basic Pearl Jewel in the centre. Another flower was used on the strip of DSP backed with a piece of Basic Black card punched using the Scallop Trim border to act as a 'stay' to keep the card up giving it the appearance of being an easel. I love the crisp clear design and use of colours of this card (even though I do say so myself!!)
The first one used the really versatile stamp set Banner Blast and its coordinating Banner punch from Sale-a-bration. This set can be used to celebrate any occasion and as well as the 'banner' stamps, there is a heart, star and flower perfect for adding as an embellishment to the banner or as a background! The Banner punch can be used to cut out any DSP as well as card stock! The colours used in this project were Whisper White, Bermuda Bay, Rich Razzleberry, Daffodil Delight and Melon Mambo. The background was embossed using the Chevron Embossing folder and the greeting taken from the Perfectly Penned stamp set. Linen thread tied into a bow and placed at the end of the banners finishes off the card.
The second card we made was based on an idea I found from an American demonstrator, Mary Fish who has lots of lovely, crisp design ideas. This one uses another Sale-a-bration stamp set See Ya Later and the Sale-a-bration DSP, Sweet Sorbet. The design of this card is called an easel and the main colours used were Whisper White, Basic Black and Pool Party which compliment the colours of this sheet of DSP perfectly. The black flowers were punched out using the Petit Petals punch from the new Spring/Summer catalogue and the Pool Party flowers from the Itty Bitty punch pack and finished off with a Basic Pearl Jewel in the centre. Another flower was used on the strip of DSP backed with a piece of Basic Black card punched using the Scallop Trim border to act as a 'stay' to keep the card up giving it the appearance of being an easel. I love the crisp clear design and use of colours of this card (even though I do say so myself!!)
Tuesday, 28 January 2014
New Ideas, New Catalogues, New Products!!!
Wow, today is a busy day in the world of Stampin Up! Today is the launch of 3, YES 3 new items!! We have the annual Sale-a-Bration event where you can earn free products for every £45 you spend from the Sale-a-Bration Catalogue from now until 31st March. Click on the link on the side of this page to download the catalogue.
 Plus we have a brand new seasonal catalogue for Spring/Summer full of great springtime designs, new ribbons, Designer Series Paper and more - just click on the link on the side of this page to see more.
 And if that wasn't enough, Stampin Up have brought out the new Texture Boutique Embossing machine. This is purely an embossing device and therefore smaller and more portable than the Big Shot but also uses the same embossing folders. Click on the link to discover more or come along to one of my classes on the 2nd Monday of the month at The Old Endowed School in Rodborough or to my Saturday Springtime class on Saturday 8th March (booking for both classes is essential).
 So if this dreary weather is getting you down and you feel the need for some inspiration, then get in touch with me to organise a party or coffee morning at your home or come along to one of my classes.
Also as part of an incentive at the moment, Stampin Up is offering new recuits, £150 worth of supplies for £99 when they sign up during the Sale-a-bration period! So just give me a call on 01452 740258 if you are interested in getting more for your money!!
Also as part of an incentive at the moment, Stampin Up is offering new recuits, £150 worth of supplies for £99 when they sign up during the Sale-a-bration period! So just give me a call on 01452 740258 if you are interested in getting more for your money!!
January's Class - Hearts a Flutter and Rev Up The Fun
A belated Happy New Year! For January's class we created a card suitable for a wedding, anniversary birthday or Valentines day by using the Hearts a Flutter stamp set; and a male card using the Rev Up The Fun stamp set.


First the romantic card! This card uses a tri fold technique where a sheet of A4 is cut with an off-set diagonal with the card in landscape so that two can be made from one sheet. The card is then folded into three which I hope you can see from the photo. Most of the hearts were stamped using the Hearts a Flutter stamp set in the current in-color Raspberry Ripple onto Whisper White card stock and then cut out using the matching Hearts a Flutter Big Shot Frame-lits. Other hearts were made by stamping the larger stamp from Creative Elements onto Whisper White and then cut out using the Full Heart punch, by cutting out Whisper White hearts and then embossing using the Perfect Polka Dots Embossing folder. The hearts were randomly adhered onto the angled edges of the card as seen in the photo. Little silver hearts were added for a bit of sparkle and punched from Silver Glimmer paper using the Small Heart Punch. The greeting was stamped using the Teeny Tiny Sentiments and punched out using the word window punch and backed with a piece of Raspberry Ripple cardstock punched out using the Modern Label punch.


Our second card for the evening was made using the Rev Up The Fun stamp set - ideal for any male. I gave my ladies a choice of which design to use, with the motorbike or the car. The stamp was inked using the Real Red and Basic Grey Marker pens. The 'sand' was created using the exhaust stamp in Versa Mark. The sky effect was created using the daubing technique with Pool Party ink on a sponge and masked using a scrap piece of card punched out with the 1 3/4" Scallop Circle.The main colours for the card were Pool Party, Real Red, Basic Grey and Crushed Curry. Three Candy Dots from the Brights collection were used to represent traffic lights. A strip of I Am Me DSP was used to back the piece of Real Red 1/4" stitched grosgrain. My ladies had the option of using the greeting from the stamp set or one from the Itty Bitty Banners.
First the romantic card! This card uses a tri fold technique where a sheet of A4 is cut with an off-set diagonal with the card in landscape so that two can be made from one sheet. The card is then folded into three which I hope you can see from the photo. Most of the hearts were stamped using the Hearts a Flutter stamp set in the current in-color Raspberry Ripple onto Whisper White card stock and then cut out using the matching Hearts a Flutter Big Shot Frame-lits. Other hearts were made by stamping the larger stamp from Creative Elements onto Whisper White and then cut out using the Full Heart punch, by cutting out Whisper White hearts and then embossing using the Perfect Polka Dots Embossing folder. The hearts were randomly adhered onto the angled edges of the card as seen in the photo. Little silver hearts were added for a bit of sparkle and punched from Silver Glimmer paper using the Small Heart Punch. The greeting was stamped using the Teeny Tiny Sentiments and punched out using the word window punch and backed with a piece of Raspberry Ripple cardstock punched out using the Modern Label punch.
Our second card for the evening was made using the Rev Up The Fun stamp set - ideal for any male. I gave my ladies a choice of which design to use, with the motorbike or the car. The stamp was inked using the Real Red and Basic Grey Marker pens. The 'sand' was created using the exhaust stamp in Versa Mark. The sky effect was created using the daubing technique with Pool Party ink on a sponge and masked using a scrap piece of card punched out with the 1 3/4" Scallop Circle.The main colours for the card were Pool Party, Real Red, Basic Grey and Crushed Curry. Three Candy Dots from the Brights collection were used to represent traffic lights. A strip of I Am Me DSP was used to back the piece of Real Red 1/4" stitched grosgrain. My ladies had the option of using the greeting from the stamp set or one from the Itty Bitty Banners.
Subscribe to:
Posts (Atom)